Resize C Drive Partition on Windows Free – Partition Resize without formatting
I have quite a few questions of people asking for a Free solution to C Drive Resize on Windows. I told myself, why don’t these people make the C drive big enough in the first place? After some time I found myself looking for the same solution but I couldn’t find it. Then I realized how difficult it can be for someone who is not even a geek like me. Well, today I will tell you, how to resize C Drive Partition on Windows PC for free without formatting. Yes, you read it right. You can resize or move any partition on your Windows PC for free.
I am using my Windows 10 laptop but this program should work on any Windows version that is not older than Vista. Before I start with the tutorial, I want to give you guys a small warning.
Warning: This tutorial is for those who don’t have very important data on their hard drive. I can’t emphasize enough on the importance of taking regular backup of your important data. Even I didn’t care about the importance of the backups until I needed to lose every single bit of my data cause of a Virus. Even if you don’t have super confidential project files on your PC, I would recommend you to backup the files that you will regret losing in an external hard drive beforehand.
How to Resize C Drive Partition on Windows without formatting for Free
Assuming that you have taken a complete backup of all of your files on a separate hard drive, I will start to list all the things that you will need and all the steps that you will need to take. So let’s get started and let me show you how you can resize C Drive (or any other partition for that matter) on a Windows PC.
Pre-Requisites:
Before we begin the Move/resize procedure, I want to tell you guys what you will need to do it successfully. There are a whole bunch of paid tools that you can use to resize or expand C drive but I have found an awesome tool that is available for free.
Name of this software is “AOMEI Partition Assistant” and you can download it from the link given below:

Once you have downloaded this program, open it up and install it just link a normal program. It doesn’t take more than 20 MB of space from your C Drive so you don’t have to worry about that.
After the installation, open it up and you will find that you have all the tools available in this program. You can Resize any of your partitions, Extend, Shrink or even move them to organize your data.
Select the drive next to C drive and try to shrink it so that you can have some empty space between C drive and the Next drive. For more understanding, look at the image attached below.
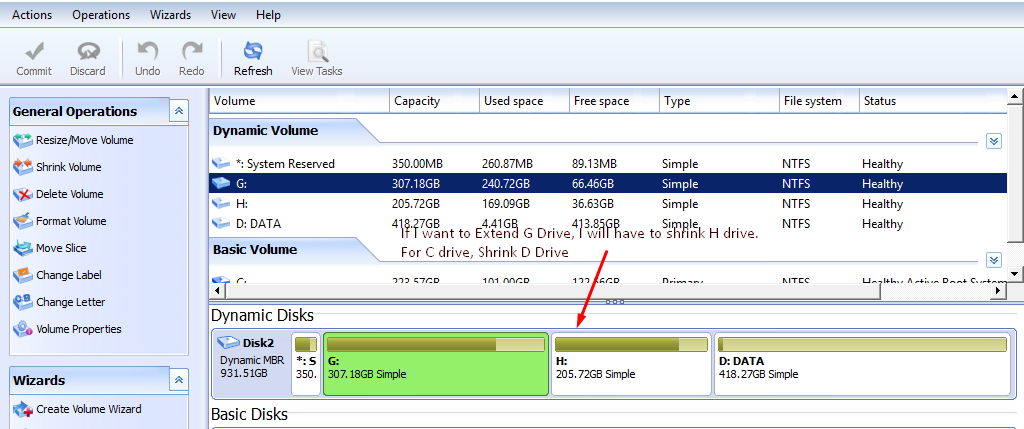
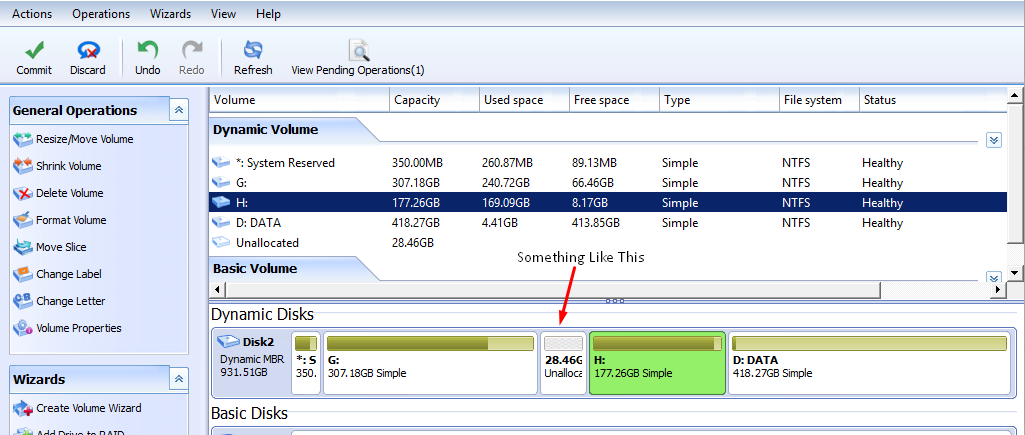
Now you should have free “Unallocated Space” between C drive and D drive. Double Click C drive and Extend it so the Unallocated Space is now part of C Drive.
Once you have extended the C drive and you are happy with the size of it, Click “Commit” button from the top left corner of the window and follow the on-screen instructions.
After all that, you will need to restart your Computer once for the changes to take effect. Now you should have more space in your C drive without formatting.
That is it for this quick and simple tutorial on how to resize and extend C drive without formatting for free. If you found this tutorial helpful then make sure to share it with others and follow us on twitter for more updates like this.